I do not think I have properly shared this on my blog yet, but cooking is not a side hobby for me, it is one of the few things that makes a regular week feel grounded and personal.
When work gets busy, I still find myself in the kitchen at the end of the day, pulling ingredients out slowly, watching something simmer, letting a simple routine reset my head.
I am the kind of person who saves recipes the way other people save quotes, and I can lose a full hour scrolling Instagram or YouTube, convinced I will cook three new dinners in the next two days.
Of course, reality is messier than the videos.
The first time I tried cooking from a new recipe on my phone, I kept tapping the screen with oily fingers and leaving streaks everywhere, which was annoying but manageable.
The real problem came when I finally ordered a cookbook stand online, thinking I was being smart and organized. It arrived looking fine, but the materials felt thin, and within a short time it started to wobble.
Then it got splattered with oil while I was pan-searing something, and because the surface was not sealed properly, it absorbed the grease in a way that never fully came out.
Not long after that, it cracked near the hinge and collapsed forward at the exact moment I was trying to read a step, which felt strangely personal, like the stand had chosen violence.
That was when I decided I would rather build something sturdy and cleanable with my own hands than keep buying versions that did not respect how a real kitchen actually works.
Why I Wanted My Stand to Be Different

I wanted something that could handle real cooking, which means steam, splatter, flour dust, and the occasional frantic wipe-down with a towel.
I also wanted it to hold three formats without drama: a heavy cookbook that never stays open, a recipe printout that likes to curl, and my phone when I inevitably go back to video.
There was one more requirement that mattered to me because I live in a rental and I keep things practical: it needed to store flat when I was not using it, or at least tuck away without becoming another object I had to style around.
So I made a simple angled stand with a bottom ledge to catch pages, plus a clear guard for splatters that could be wiped clean in seconds.
Materials I Used (With Real Sizes and Counts)
I built mine using basic wood and simple hardware, because I wanted it to be sturdy without turning it into a complicated project.
Wood pieces (all ¾-inch thick boards are ideal):
- 1 back panel: 12 in (H) × 9 in (W)
- 1 base panel: 10 in (D) × 9 in (W)
- 1 bottom lip/ledge: 9 in (W) × 1.5 in (H)
- 2 side supports (triangle pieces): cut from a board at least 10 in × 8 in (you will cut into two identical right triangles)
- Optional: 1 top stabilizer strip: 9 in (W) × 0.75 in (H) (this helps prevent wobble if your back panel is thin)
Clear splash guard (optional but worth it):
- 1 acrylic sheet: 9 in (W) × 8 in (H), around 2-3 mm thick
- 2 small binder clips or 2 tiny screws with washers (for removable mounting)
Hardware:
- 1 small hinge set (or 2 small hinges): 2-inch hinges work well
- 6-10 wood screws: ¾ in to 1 in (depending on thickness)
- Wood glue
- Sandpaper: one medium grit and one fine grit
- Finish/sealant: a wipe-on clear sealant or water-based polyurethane (kitchen-friendly and easy to clean)
Tools:
A saw (hand saw or jigsaw), drill, measuring tape, pencil, clamp (helpful but not required), and something flat to sand on.
Step 1: Decide the Angle First (This Controls Everything)
Before cutting anything, I tested the angle. I held a book against a cutting board to see what felt comfortable to read while standing at the stove.
I learned that if the angle is too upright, the book wants to fall forward, and if it is too flat, you end up hunching your shoulders to read.
The angle that felt right for me was roughly 60 degrees from the base, which is enough tilt to read comfortably while still keeping weight stable.
This is why the side supports matter so much. They are the bones of the stand.
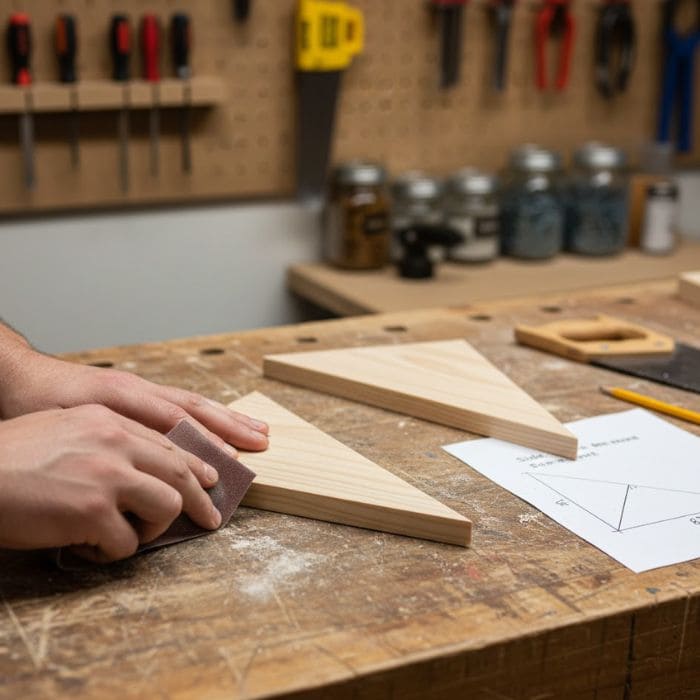
Step 2: Cut the Side Supports Like Strong Little Bookends
I cut two identical right triangles for the side supports, because that shape gives strength without adding bulk.
My triangles measured roughly 8 inches along the bottom, 6 inches up the back, with a diagonal cut forming the slope that the back panel would rest on.
If you want to picture it, imagine the triangle sitting on the base like a little ramp. The back panel leans against the diagonal edge. This is what keeps the stand from collapsing.
After cutting, I sanded the edges immediately, especially the diagonal edge, because that is where your hands will touch when you move the stand.
Step 3: Attach the Side Supports to the Base

I positioned the two triangles on the base panel, one on the left edge and one on the right edge, leaving the center open.
I lined them up so the bottom edges sat flush with the base, then I marked where screws would go. I used a small amount of wood glue first, then drilled pilot holes, then added screws.
This part is important, because if you skip pilot holes, the wood can split, and a split base is a kitchen stand that will eventually wobble no matter how careful you are.
Once attached, I pressed down on the base and gently pushed the supports from side to side to see if anything shifted. If something shifts at this stage, it will shift more later when you add a heavy book.
Step 4: Add the Back Panel and Test It With a Real Cookbook
Next, I set the back panel against the diagonal edges of the side supports. I did not attach it immediately.
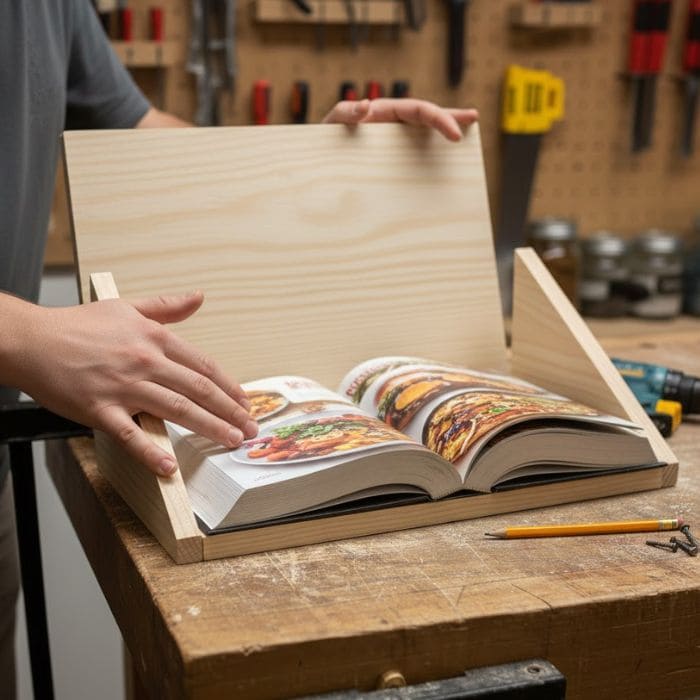
I tested it by placing a heavy cookbook on it first, the kind that refuses to stay open, because that is the real test. If the stand can handle a stubborn cookbook, it can handle anything.
Once I liked the position, I marked it lightly with pencil, then used glue and screws to attach the back panel to the side supports from the outside. I kept screws near the top and middle to prevent wobble.
At this point, the stand should already feel solid, even without the hinge.
Step 5: Build the Bottom Ledge (So Pages Stop Sliding)
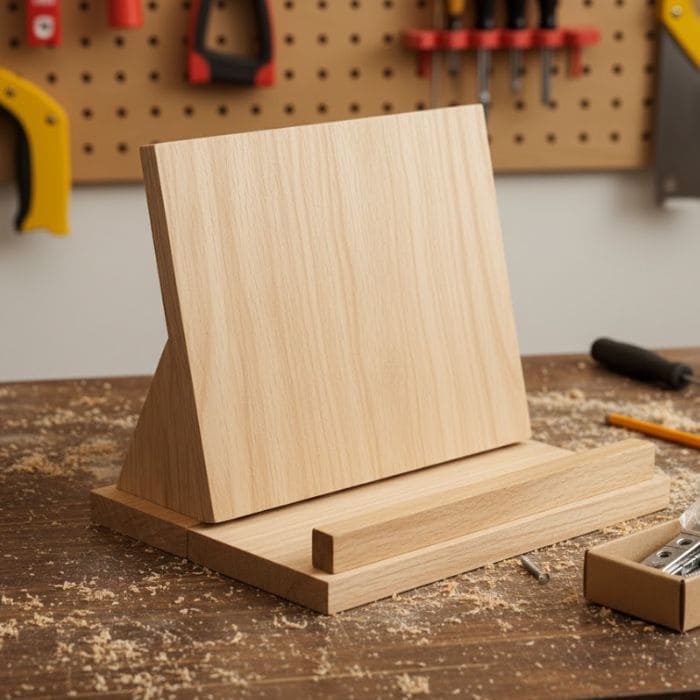
The bottom ledge is what makes the stand usable. Without it, paper slides, books slump, and you end up holding things with one hand while stirring with the other.
I attached the 9-inch by 1.5-inch strip along the bottom front of the back panel, right where the back meets the base.
I glued it first, then screwed it in from the back so the front stayed clean. That ledge becomes the shelf your cookbook rests on, and it also catches recipe cards and phones.
A small detail that helped me was sanding the top edge of that ledge slightly rounded, because sharp corners in a kitchen get annoying fast.
Step 6: Add a Hinge Only If You Want It to Fold
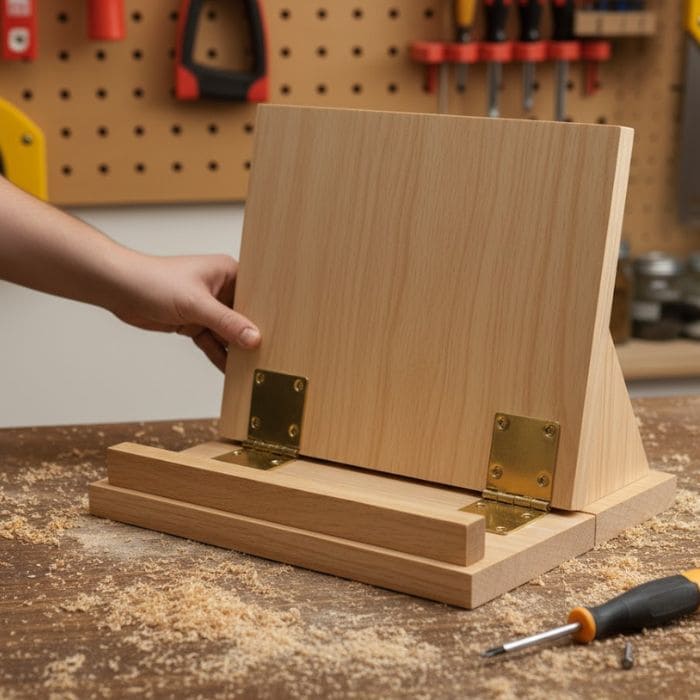
If you want the stand to fold flat for storage, this is where the hinge comes in. I attached a hinge along the line where the base meets the back panel.
Two small hinges spaced evenly worked best for me, because they kept the movement stable.
If you do not care about folding, you can skip the hinge and simply keep the back panel fixed, which makes the stand even sturdier. I chose folding because I like being able to tuck it beside the fridge when I am not cooking.
Step 7: Seal It Like You Expect It to Get Dirty
This step is where my broken oily online stand experience really influenced me. A kitchen object needs a finish. Even if you are neat, steam and oil travel. If wood is unsealed, it will absorb stains and odors.
I used a clear water-based sealant and applied multiple thin coats, letting each coat dry fully before the next.
I paid extra attention to the bottom ledge and the base, because that is where splatters land most often. After the final coat, I let it cure for at least a day before using it near heat.
The difference is huge. Sealed wood wipes clean. Unsealed wood holds onto your cooking forever.
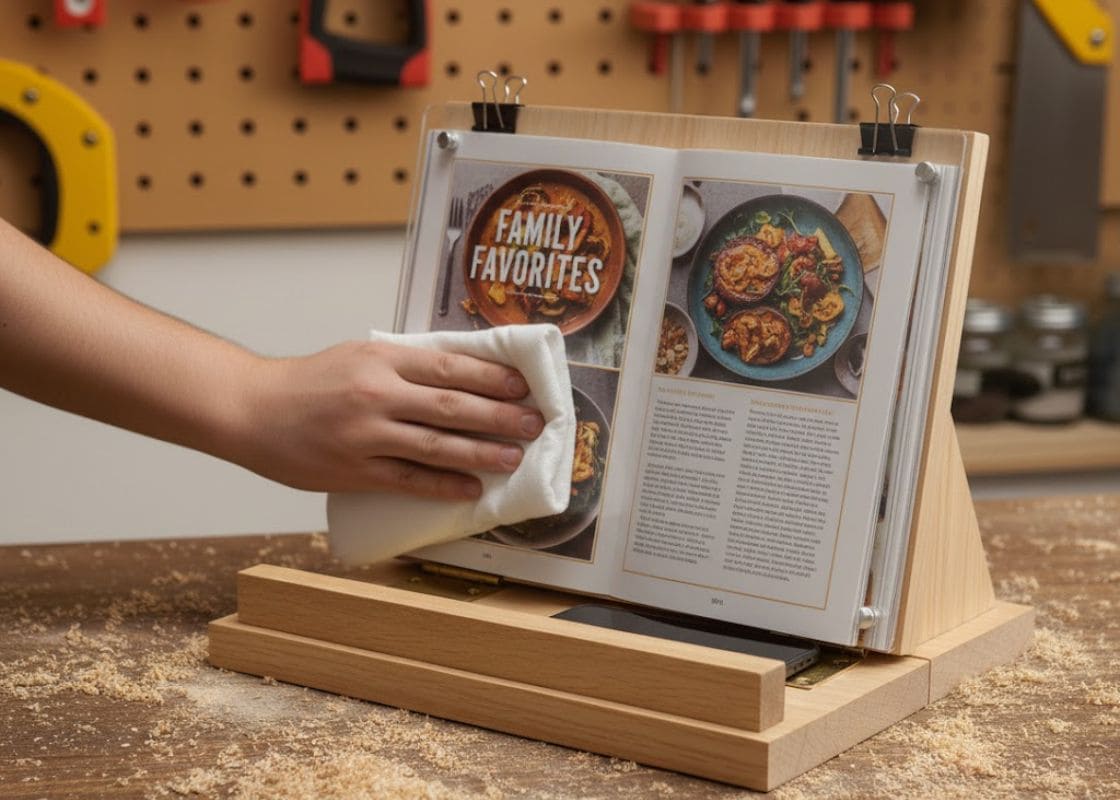
Step 8: The Clear Splash Guard That Changed Everything
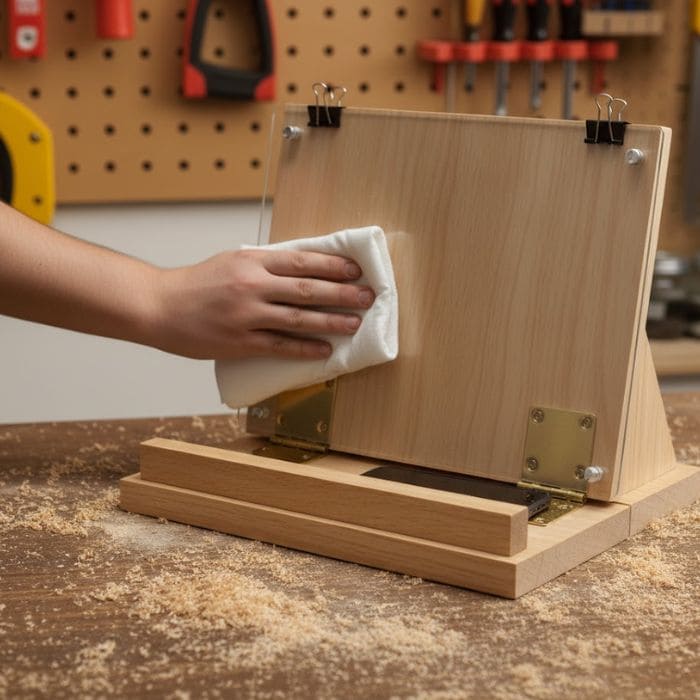
This was my favorite addition because it solved the exact problem that ruined the store-bought stand.
I cut an acrylic sheet to 9 inches wide and 8 inches tall, then clipped it to the front of the stand using small binder clips so it could be removed easily.
When I am frying or searing, that guard catches tiny oil droplets before they reach the book or my phone. After cooking, I wipe it down with a damp cloth, and the stand still looks clean.
It feels like a small detail, but it turned the stand from cute DIY into something that actually works in a real kitchen.
What I Love About Using It Now
Now when I try a new recipe from Instagram or YouTube, I do not have to touch my phone constantly or prop it against something unstable.
My cookbook stays open. My recipe printouts stop curling and sliding. I can cook with both hands and keep my attention where it belongs, on the food, not on a screen falling over near a pan.
It is funny how such a small object can change the entire experience of cooking, but I think that is the truth of small homes and rentals. The right pieces earn their place by making daily life easier.